
 In celebration of the centenary year of Alan Turing’s birth Jeroen van den Bos and Davy Landman at Centrum Wiskunde & Informatica (CWI), Amsterdam (Netherlands) built a LEGO version of a Turing machine - the universal computing device that theoretically models how all computation is done. You can read about it at LEGO Turing Machine.
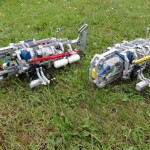
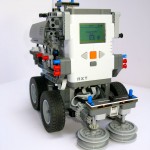
 Mike Brandl is a fellow LEGO MCP and all-round outstanding LEGO builder. His latest project certainly pushes the envelope when it comes to putting the NXT in a harsh environment. This time he has built a LEGO submarine that can navigate successfully underwater. The NXT is housed in a plastic sealed bag, with glue around the holes for the cables to emerge.
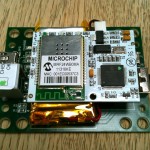
Danny Benedettelli recently provided me with a NXT2WIFI prototype sensor to start development of a leJOS driver for it. I’ve been working on the code in my (limited) spare time and have a basic client and server interface developed in Java. This is available in the latest SVN snapshot of leJOS.

The good people at HumaRobotics sent me a prototype WifiBlock to develop a leJOS driver around. I’m working on this in parallel with the NXT2WIFI driver, so it’s interesting to compare both sensors.
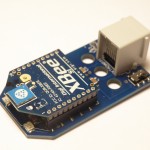
When I was developing the Lego Street View Car I realised that I needed a way to control the car more reliably than Bluetooth, and without relying on the existing of a wifi network. The NXTBee is the obvious choice. It uses the industry-standard XBee protocol giving high-speed serial transmission over a 300 ft range without any setup or the overhead of Bluetooth communication.
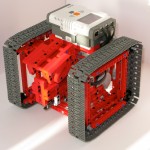
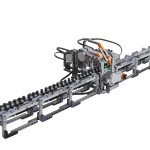
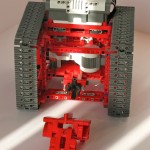
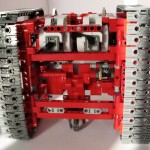
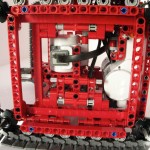
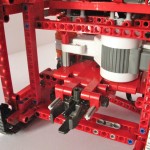
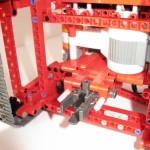
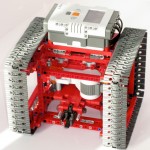
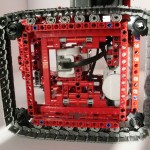
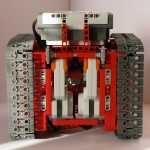
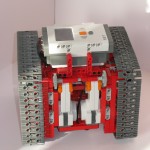
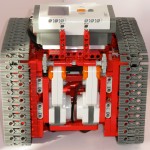
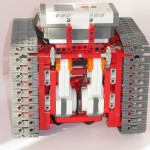
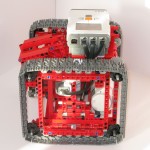
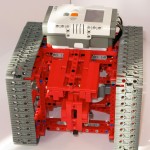
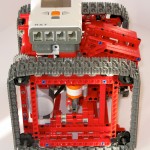
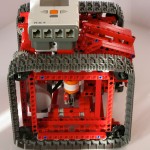
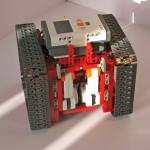
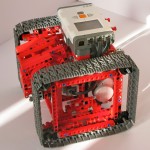
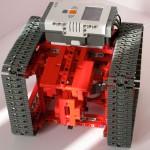
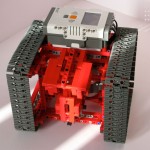
This is the building instructions for the Queboid Shooter robot with built-in Zamor Sphere Shooter.


My Queboid robot has been around for a while, but for the World Robot Olympiad event in Abu Dhabi this year I decided to add a Zamor sphere shooter to the basic model. I swapped out the power function motors to use NXT motors. The idea was that kids could drive the robot using Philo’s joystick design communicating over Bluetooth from the remote to the NXT in the Queboid.
Building Instructions
• View step-by-step Queboid Shooter Building Instructions.pdf as a PDF file (28.6 MB download)
• View a gallery of images with step-by-step instructions.
• Download the QueboidShooter.ldr file to view in LDView or MLCad.
• The building instructions remote control for Queboid is from Philo’s joystick.
Programming
The Queboid control program is written in NXC. You need two NXTs; one is mounted on the Queboid robot, and the other is in the joystick unit. The joystick needs to connect to the Queboid using Bluetooth and is the master.
qbcontrol.nxc is the source code that runs on the control joystick.
qbslave.nxc is the source code that runs on the Queboid robot.
Operation
To operate the Queboids follow these steps:
- Turn on the NXT on the joystick and the Queboid.
- Enable Bluetooth on both NXTs.
- On the joystick search for the Queboid NXT in the Bluetooth menu.
- Connect to the Queboid from the joystick using Bluetooth.
- Start the qbslave program on the Queboid.
- Start the qbcontrol program on the joystick.
- Center the joystick and press the fire button.
- Push the joystick forward to drive forward, and left/right to turn. Press the joystick button to fire a ball.


Video
I brought the Queboid Shooters to the World Robot Olympiad in Abu Dhabi. You can watch a short video of them in action below:
One of the biggest challenges developing programs on the NXT is fixing them when they go wrong. The NXT has a small screen with only 8 lines of text displayed. It’s difficult to know what is causing a program to fail, and to have a record of what a program did.
I created this logging library in NXC to solve this problem. It presents a very simple API that you can use in your NXC programs to log data into a text log file as your program runs. Each entry is timestamped with the current NXT tick counter, so you can see when your program reached a certain point. The library supports logging text strings, values and byte arrays. Once your program has finished running you can download the log file to your PC using Bricxx or NeXTTools on the Mac.
How to use the logging library
To use the logging library you include it at the start of your NXC program as follows:
///////////////////////////////////////////////////////////
bool LOGGING=true;
#define LOGFILE "mylogfile.txt"
#define LOGFILE_SIZE 30000
#include "logging.nxc"
///////////////////////////////////////////////////////////
The boolean variable LOGGING enables or disables the logging functions. If set to true then data is logged into the log file. If false then nothing happens. Why add this? Well logging data to a file on the NXT takes time, and makes your program run slower. You can use the LOGGING variable to debug a program and then once you are satisfied that the program is correct simply set it to false and your program will no longer generate a logfile.
The name of the log file to create is defined in the LOGFILE macro. I suggest you name the logfile to be the same name as the program that creates it so you can keep track of which log files belong to which programs on your NXT.
The NXT firmware requires that every file must have a fixed size when it is created. In the example above the LOGFILE_SIZE macro is set to 30000 bytes. The logfile named mylogfile.txt will grow in size until it reaches 30000 bytes of content, at which point no new data is saved into the logfile.
Download the logfile library: logging.nxc.
Debug Logging Library API
The logging library contains the following functions:
- openLogFile(filename, filesize): this function creates a logfile with the given filename and filesize. It should be the first function called in your main() task.
- closeLogFile(): this function closes the logfile previously opened by openLogFile(). Only one logfile can be open at any one time in a program.
- writeLogString(s): write the string s to the logfile.
- writeLogByte(b): write a single byte value to the logfile.
- writeLogBytes(b): write a byte array to the logfile. A byte array can be any size. The byte array is written in hexadecimal format with each byte separated by a space.
- writeLogValue(s, v): write a (name,value pair) to the logfile. Used to record the value of a named variable. For example: writeLogValue(“foo is now”, foo);
- writeLogValue2(s, v1, v2): write a (name,value1,value2) triple to the logfile. Used to record the value of two variables, for example writeLogValue2(“Coordinates”, x, y)
- writeLogValue3(s, v1, vw, v3): write a (name,value1,value2,value3) quad to the logfile. Used to record the value of three variables, for example writeLogValue3(“Index”, i, j, k)
Sample Program
To see the logging library in operation I’ve provided an example program named logme.nxc below. It simple calls each of the logging functions to demonstrate how they work.
///////////////////////////////////////////////////////////

bool LOGGING=true;

#define LOGFILE "logme.txt"

#define LOGFILE_SIZE 3000

#include "logging.nxc"

///////////////////////////////////////////////////////////
task main() {
int i, j, k;
byte b[16];
openLogFile(LOGFILE, LOGFILE_SIZE);
writeLogString(“I have started main”);
i = 5;
j = 17;
writeLogValue2(“i, j”, i, j);
writeLogString(“initialising array…”);
for(i=0; i < 16; i++) {
b[i] = i * 5;
}
writeLogString(“Done”);
writeLogBytes(b);
closeLogFile();
}
Sample logfile output
So what does the logfile look like from the program above? First of all we launch NeXTTools on the Mac (or Bricxx on your PC) to view the contents of the NXT filesystem.
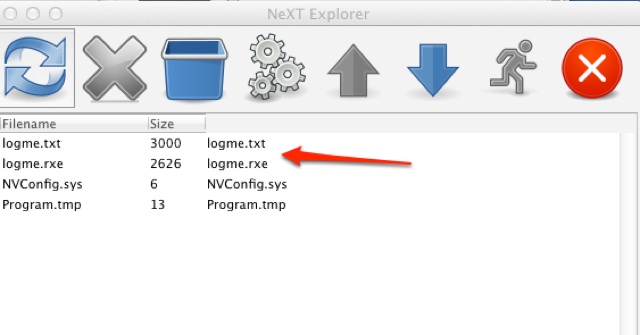
As you can see running the logme program create a logfile named logme.txt. Now let’s see what’s in the logfile (the timestamps in your logfiles will obviously be different as the clock in your NXT will not be the same as mine):
Logfile opened at 100175 ticks

100184 : I have started main

100186 : i, j = 5,  17

100187 : initialising array…

100191 : Done

100192 : 0 5 a f 14 19 1e 23 28 2d 32 37 3c 41 46 4b

Logfile closed at 100205 ticks
After a long break I’m back with a new project. This autonomous street sweeper was inspired by the type we have driving around here in Ireland. It started as a simple project to build a 3-wheeler trike using a turntable, and like most LEGO it morphed into something else entirely.
